Introduction
Storm Protection reduces the adverse effects of any network loop that would potentially swamp the network. There are three facets that work together to protect the network from storms:
- Loop Detection
- Thrash limiting
- Storm Control
Loop Detection
Loop Detection monitors traffic for the return of a loop detection probe packet. In the event of a problem, it can take a variety of actions including logging a fault, alerting the network administrator, or disabling a link.
You can configure loop detection to apply one of the following mechanisms when a loop condition is detected:
- Block all traffic on the port (or aggregated link) that detected the loop, and take down the link.
- Block all traffic on the port (or aggregated link) that detected the loop, but keep the link in the up state.
- Block all traffic on a VLAN. Note that setting this parameter will also enable ingress filtering. This is the default action.
- Take no action, but log the details.
- Take no action.
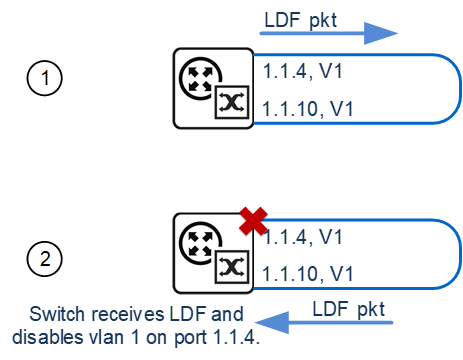
To detect loops this feature operates by transmitting a series of Loop Detection Frames (LDFs) from each switch port out into the network. If no loops exist, then none of these frame should ever return. If a frame returns to its originating switch, the detection mechanism assumes that there is a loop somewhere in the network and offers a number of protective options.
Each LDF is a Layer 2 LLC frame that contains the following components:
- The source MAC address of the originating switch
- The destination MAC address of the non-existent end station 00-00-F4-27-71-01
- VLAN ID (where the port is a tagged member of a VLAN).
- A randomly generated LDF ID number.
You can set the detection mechanism to remember the LDF ID of up to 5 of the most recently transmitted LDF frames. Each of the 5 most recently transmitted frames is compared with every frame that arrives at that same port.
To enable loop protection and configure its basic parameters, you use the loop-protection command. Below are 4 examples of enabling Loop Protection:
Example 1: To enable the loop-detect mechanism, and generate loop-detect frames once every 5 seconds, use the command:
awplus(config)#loop-protection loop-detect ldf-interval 5
Example 2: To disable an interface, and bring the link down, when a network loop is detected, use the command:
awplus(config-if)#loop-protection action link-down
Example 3: To configure a loop protection action timeout of 10 seconds, use the command:
awplus(config-if)#loop-protection timeout 10
Example 4: To configure a loop protection action delay time of 10 seconds, use the commands:
awplus(config-if)#loop-protection action-delay-time 10
Thrash Limiting
MAC address thrashing occurs when MAC addresses move rapidly between one or more ports or trunks, for example, due to a network loop. Thrash limiting enables you to apply actions to a port when thrashing is detected. It is supported on all port types and also on aggregated ports.
There are several different thrash actions that you can apply to a port when thrashing is detected. These actions are:
- learnDisable: MAC address learning is temporarily disabled on the port.
- portDisable: The port is logically disabled. Traffic flow is prevented, but the link remains up. The device at the other end does not notice that the port has changed status, and the link LEDs at both ends stay on.
- linkDown: The port is physically disabled and the link is down. This is equivalent to entering the shutdown command.
- vlanDisable: The port is disabled only for the VLAN on which thrashing has occurred. It can still receive and transmit traffic for any other VLANs of which it is a member.
Thrash-limiting actions are initiated when MAC addresses are added and removed from a port’s MAC table faster than a given rate. The rate is 10 MAC address changes per second by default. You can change it with the mac address-table thrash-limit command.
Below are 4 examples on configuring Thrash limiting:
- To block all traffic on a VLAN on port1.1.1 if the switch detects thrashing for that VLAN on that port, use the following commands:
awplus# configure terminal
awplus(config)# interface port1.1.1
awplus(config-if)# thrash-limiting action vlan-disable
- To set the thrash limiting action to its default on port1.1.1, use the following commands:
awplus# configure terminal
awplus(config)# interface port1.1.1
awplus(config-if)# no thrash-limiting action
- To set the thrash limiting timeout to 5 seconds on port1.1.1, use the following commands:
awplus# configure terminal
awplus(config)# interface port1.1.1
awplus(config-if)# thrash-limiting timeout 5
- To set the thrash limiting timeout value to its default on port1.1.1, use the following commands:
awplus# configure terminal
awplus(config)# interface port1.1.1
awplus(config-if)# no thrash-limiting timeout
The logs will show when the thrash-limiting feature has been triggered. In the example below, you can see much useful information from the log message such as which port and VLAN the occurrence happened on along with the MAC address of the device causing the thrashing.
2020 Aug 31 13:53:44 local6.warning awplus-2 EXFX[1796]: Thrash-limiting: Disabled learning on port1.3.9 by 001b.ee68.b42d on vlan 4
2020 Aug 31 13:53:45 local6.warning awplus EXFX[1773]: Thrash-limiting: Re-enabled learning on port1.3.9
2020 Aug 31 13:53:51 local6.warning awplus-2 EXFX[1796]: Thrash-limiting: Disabled learning on port2.8.5 by 001b.ee68.b42d on vlan 4
2020 Aug 31 13:53:51 local6.warning awplus EXFX[1773]: Thrash-limiting: Disabled learning on port2.8.5 by 001b.ee68.b42d on vlan 4
2020 Aug 31 13:53:52 local6.warning awplus EXFX[1773]: Thrash-limiting: Re-enabled learning on port2.8.5
When a port is disabled, either completely or for a specific VLAN, it remains disabled until it is manually re-enabled in any of the following ways:
- by using SNMP
- by rebooting the switch or stack
- by specifying a thrash timeout value along with the thrash action
- via the CLI
Storm Control
If you want to limit broadcast traffic coming in to a certain port then you will need to configure storm-control on that port. The packet storm-control feature enables you to set limits on the reception rate of broadcast, multicast frames and destination lookup failures. You can set separate limits beyond which each of the different packet types are discarded.
When configuring storm-control, the limit that you set will be a percentage of the full 100%. So if you set the level to 30, this is 30% of the full 100% of broadcast packets coming in.
This command should be implemented on the port level. An example of these commands are below.
awplus# configure terminal
awplus(config)# interface port1.0.4
awplus(config-if)# storm-control broadcast level 30